Building an IoT-powered Fridge
Imagine the scenario: guests are about to arrive, and you realize your fridge is running low on beer. Your BoA (Beverage on Arrival) SLA is in danger, and panic sets in, but fear not! In this blog post, we'll walk you through a solution we've devised to never end up in this situation again. By integrating AWS services, IoT technology, Lambda functions, and even a touch of Rust programming, Elva created a system that not only alerts us when our beverage stock is running low but also has the potential to automatically place orders to replenish our supplies in the future.
Using AWS, IoT core, Lambda, Cloudwatch, TS, Rust
Requirements (total cost: ~31$)
4 Weight sensors & 1 Amplifier/ADC
A few hours of your lifetime
TLDR; Here are the projects
The Setup
The overall setup looks like this.
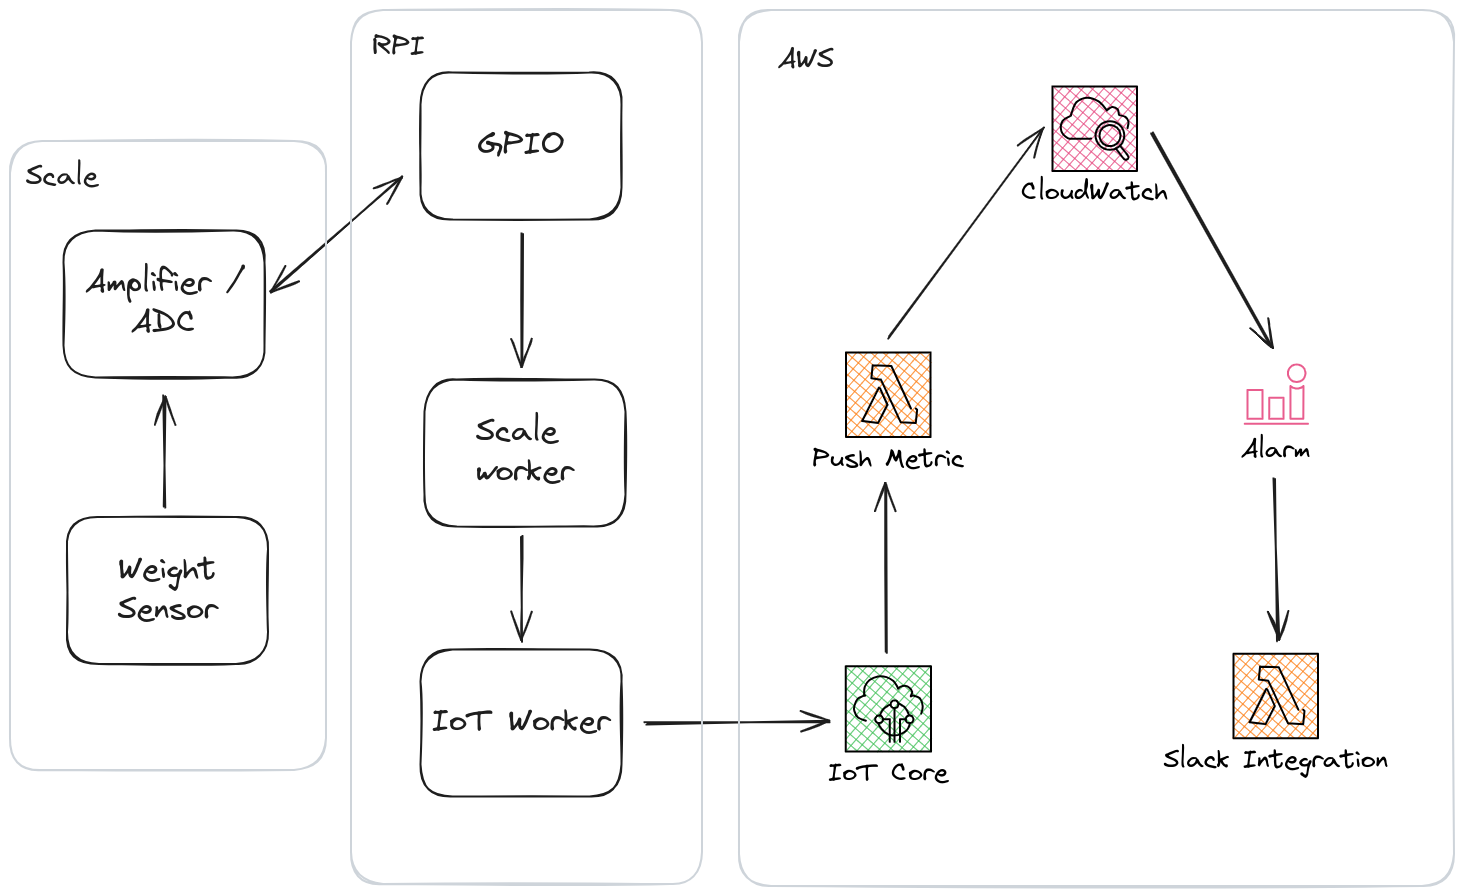
The image displays an abstract view of the data flow in the finalized system.
The sensors output an analog value depending on the applied pressure (weight). The reading is transformed into a digital output using an analog-to-digital converter (ADC).
That resulting data is sent to the scale-reading-process using serial communication (via Raspberry’s GPIO).
Next, the first (scale worker) process collects and transforms the digital values into something more understandable to us. The second (IoT worker) pushes that data to AWS IoT core and, in turn, other upstream services like Slack.
The Cloud
AWS IoT Core, Lambda, and Cloudwatch Metrics
As the infrastructure diagram notes, the IoT worker running on the Raspberry is pushing the translated scale readings to IoT core (using MQTT). Once we're in the cloud, we can do whatever we like. The main gist is that we have two handlers and some certificates.
We pass the final readings to Cloudwatch using lambda in this specific setup.
// ~/byra-watcher/src/lambda.ts
const metrics = new Metrics({ namespace: "elva-labs", serviceName: "byra" });

export const handler = middy(async (
  event: {
    grams: number
  }) => {
  metrics.addMetric("beerWeight", MetricUnits.Count, event.grams);
}).use(logMetrics(metrics));
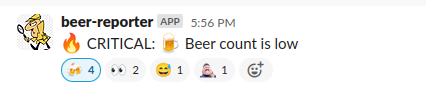
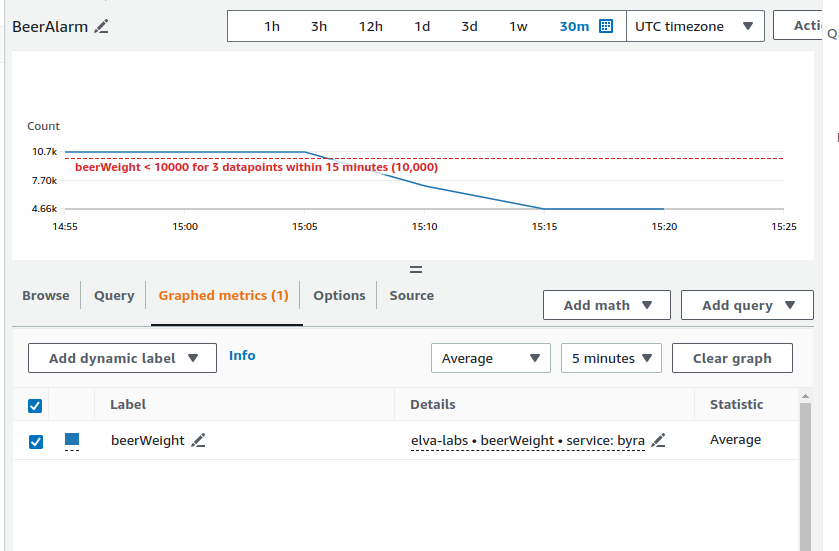
In Cloudwach, we can follow the readings and create alarms if the weight is below a specific threshold value. If this threshold value is breached, another lambda is triggered, which sends a message to Slack so that everyone can see that we have a critical problem to resolve.
// ~/byra-watcher/src/slack.ts
export const handler: EventBridgeHandler<'_', CloudWatchAlarmDetail, void> = async (event) => {
  console.info(`Received event: ${JSON.stringify(event)}`);

  await new IncomingWebhook(Config.SLACK_URL).send({
    text:
      event.detail.state.value === "ALARM"
        ? `${WARN_EMOJI} CRITICAL: ${BEER_EMOJI} Beer count is low`
        : `${HAPPY_EMOJI} ALL GOOD: ${BEER_EMOJI} We have beer!`,
  });
};
It's time to deploy our handlers and acquire our "thing"-certificates so the RPI can push data to the cloud.
// ~/byra-watcher/stacks/ByraStack.ts
// ...
const { thingArn, certId, certPem, privKey } = new ThingWithCert(stack, 'ByraScale01', {
  thingName: 'byra-01',
  saveToParamStore: true,
  paramPrefix: 'devices',
});
// ...
cd ~/byra-watcher && npm run deploy

SST v2.36.1

➜  App:     byra-watcher
   Stage:   dev
   Region:  eu-north-1
   Account: ...

|  ByraStack PUBLISH_ASSETS_COMPLETE

✔  Deployed:
   ByraStack
   Byra01Thing: arn:aws:iot:eu-north-1:...:thing/byra-01
   CertId: ...
   CertPem: -----BEGIN CERTIFICATE-----
            ...
            -----END CERTIFICATE-----

   PrivKey: -----BEGIN RSA PRIVATE KEY-----
            ...
            -----END RSA PRIVATE KEY-----
Who could have guessed? Super simple. Now, we have our infrastructure deployed and our certificates generated.
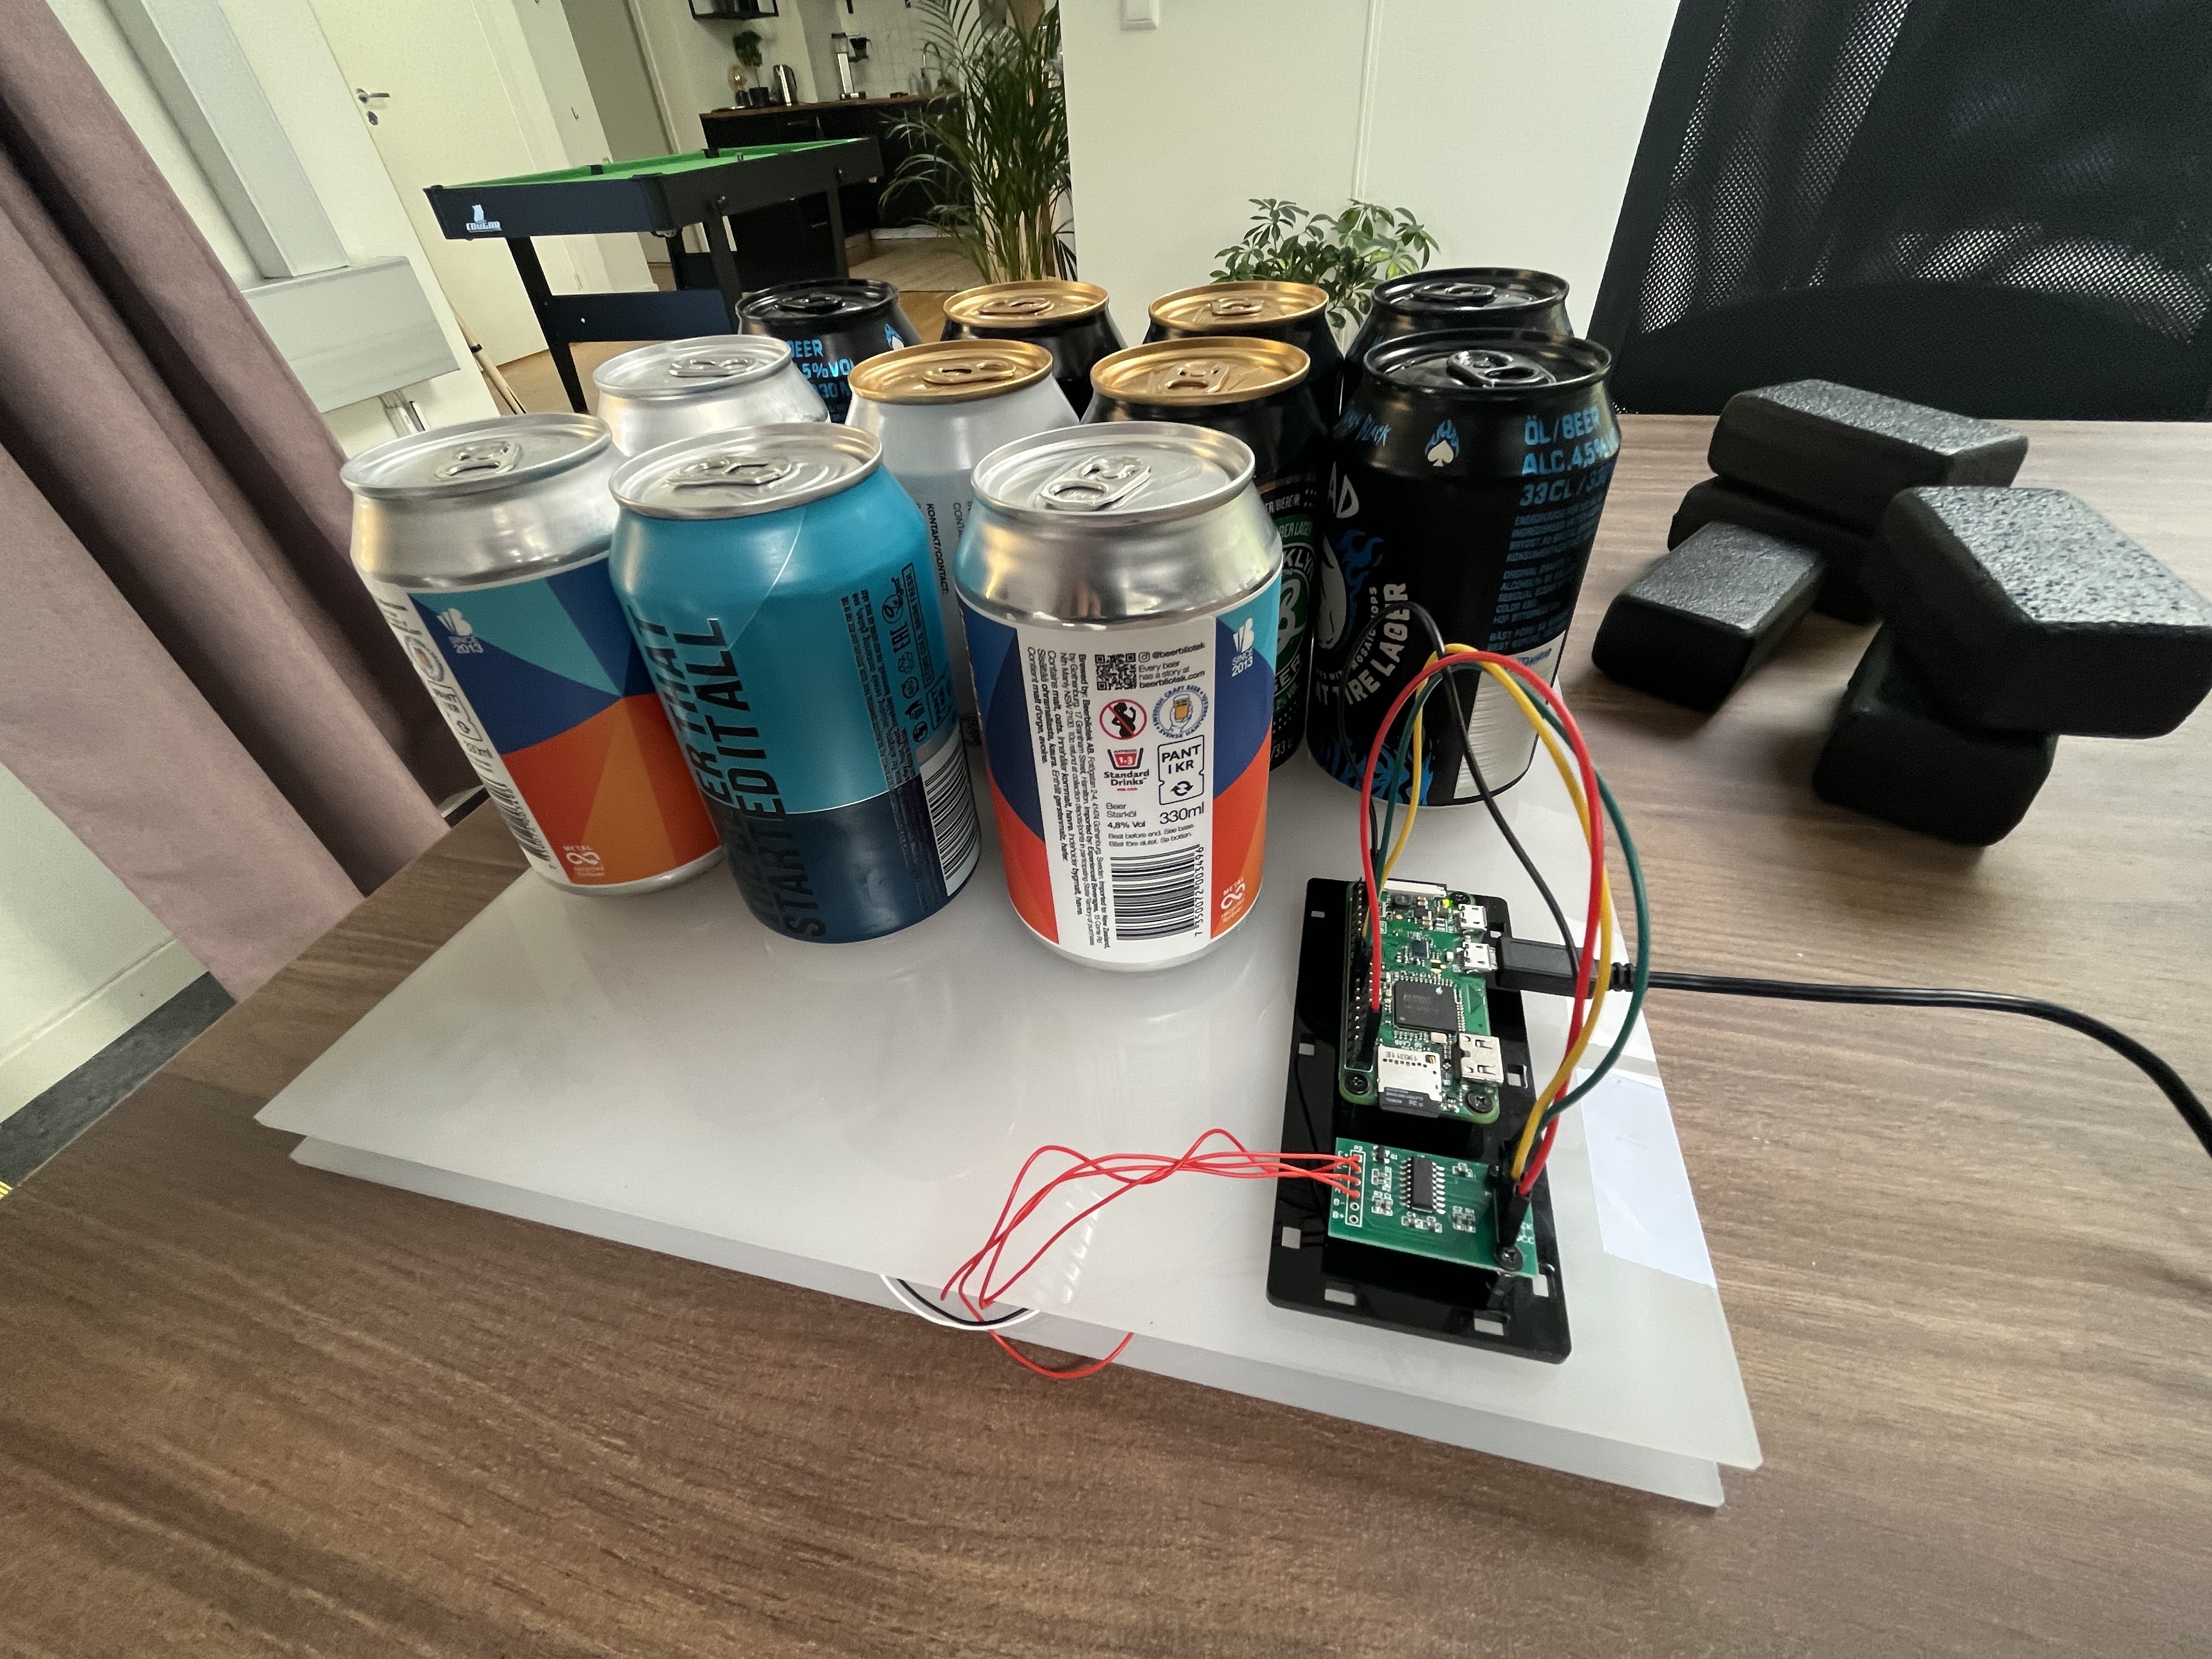
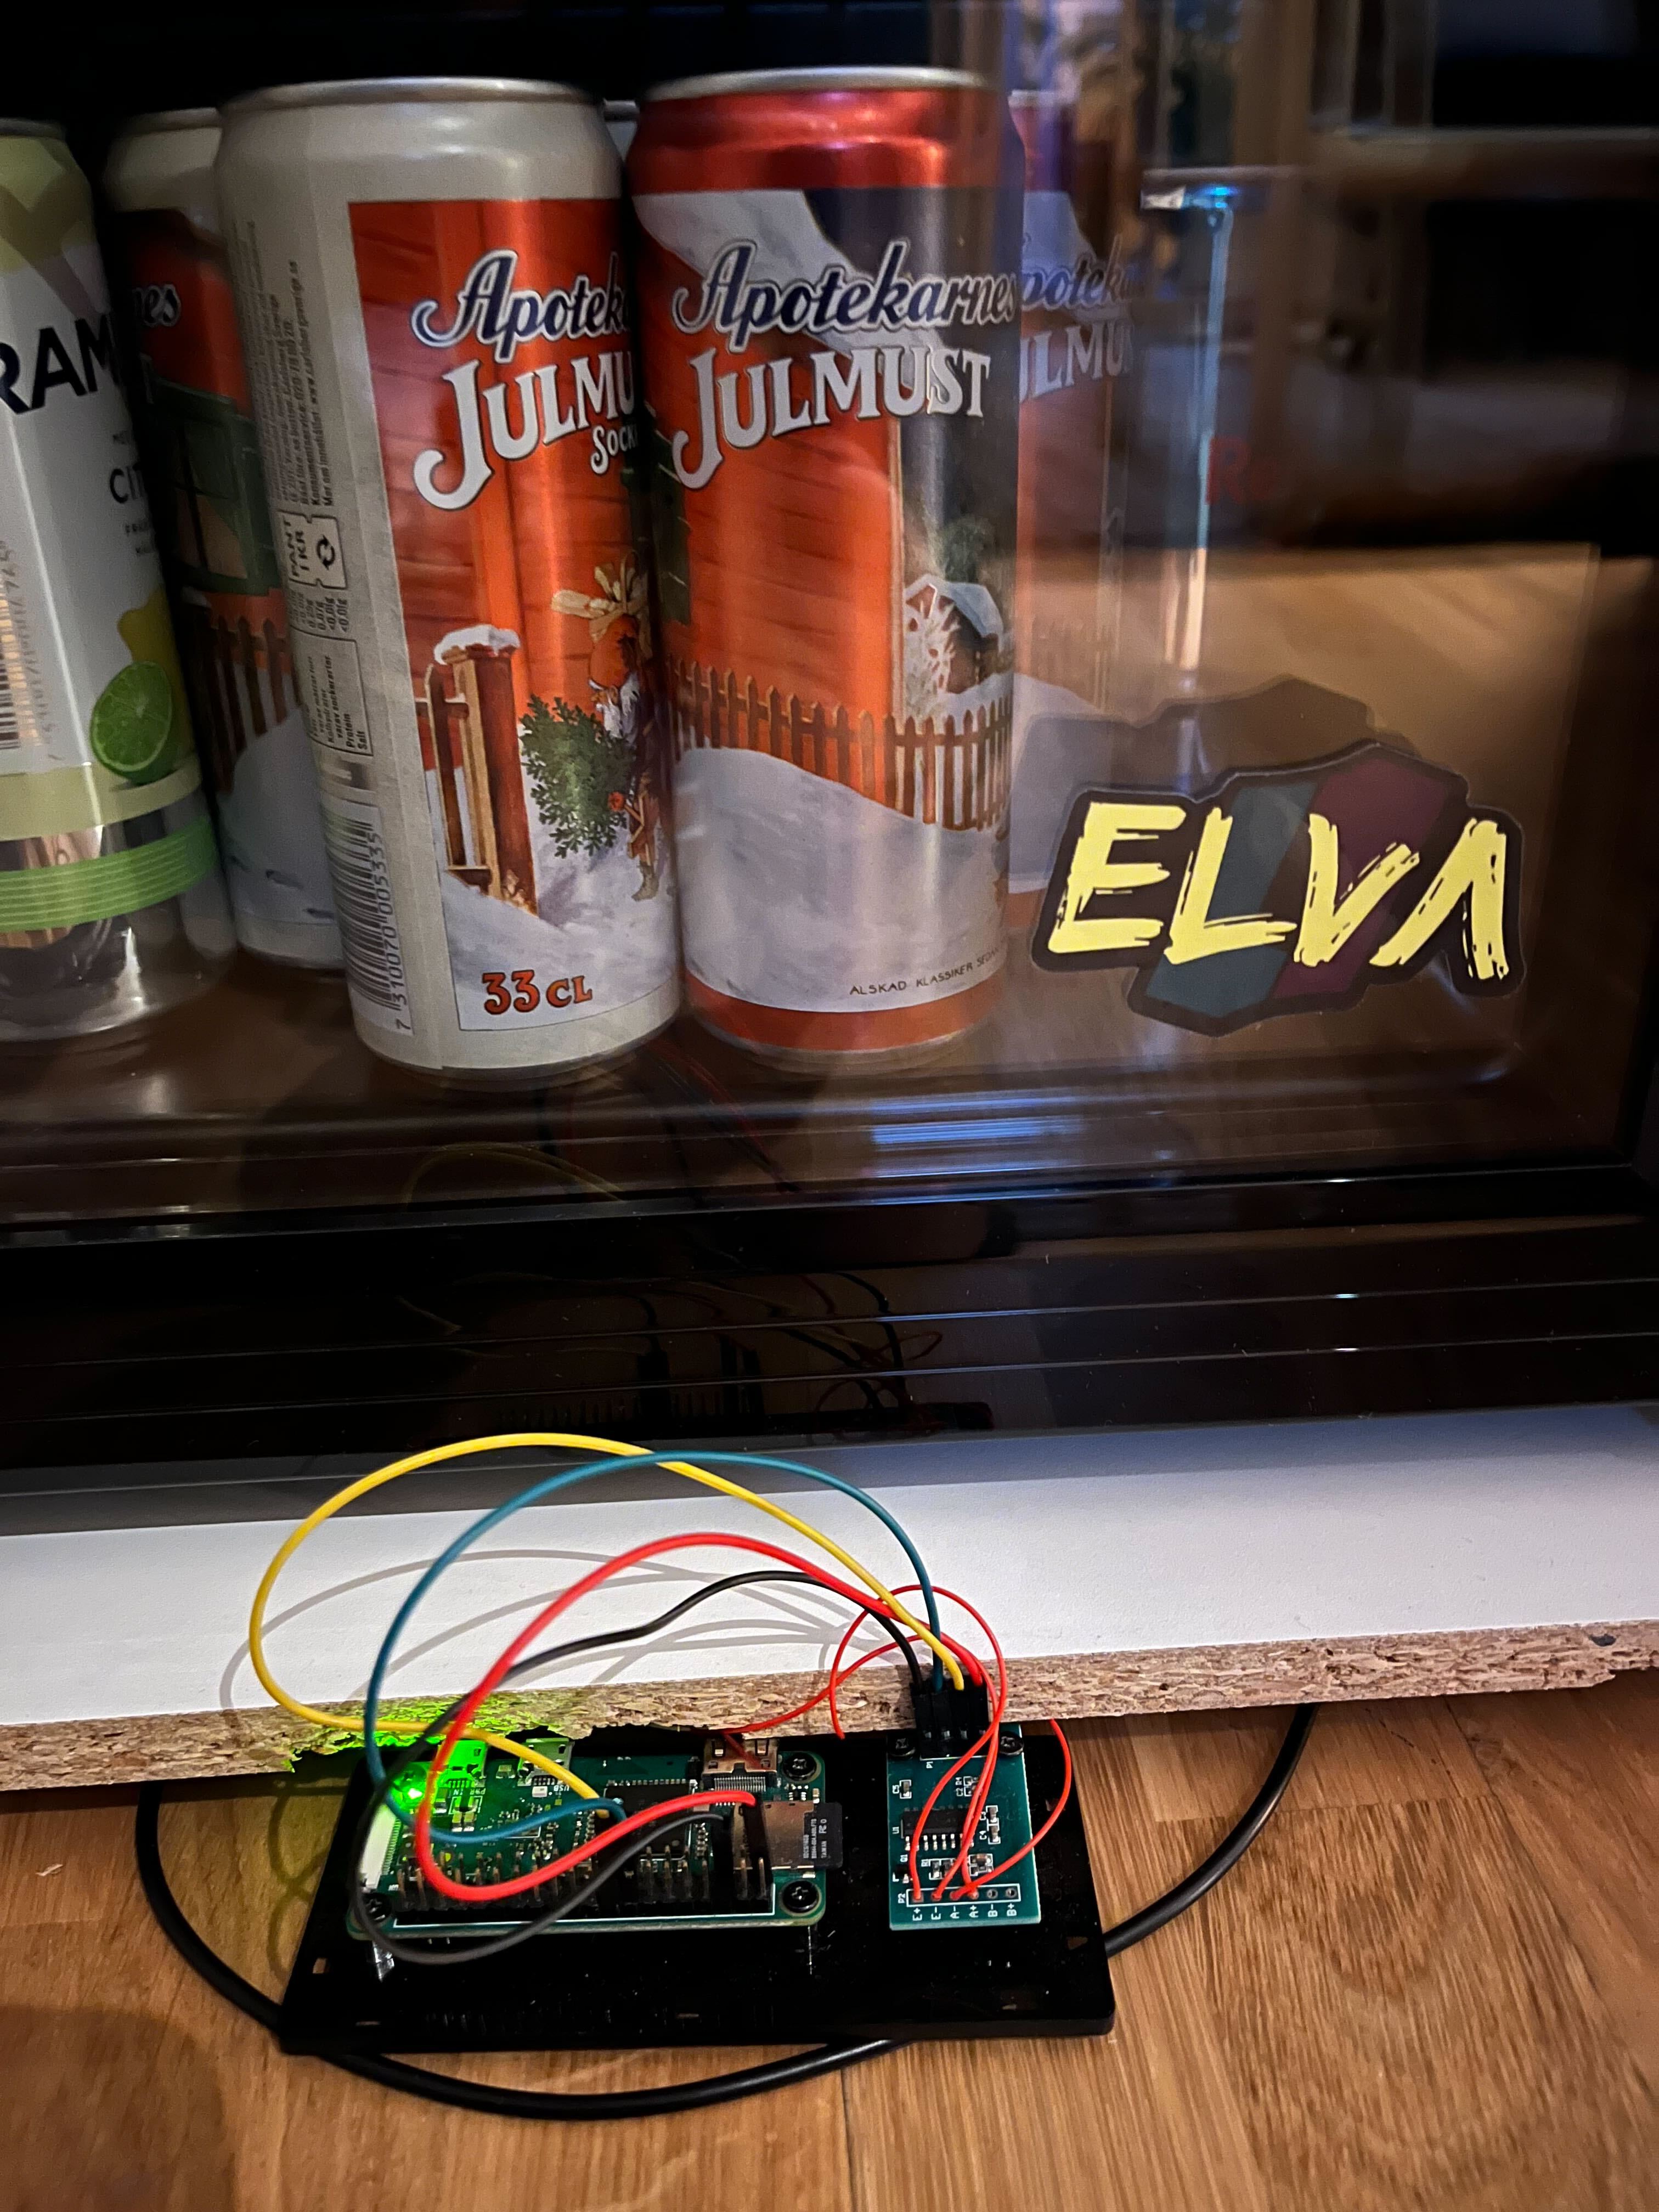
The Hardware
The objective of the Raspberry is to read data from the sensors, transform the reading into something we can understand, and then push that data to the cloud for further action.
The scale worker code can be found here.
The IoT worker code can be found here.
The wiring guide for the cells can be found here.
To read data, we needed to know how to communicate with the analog-to-digital (ADC) component. Reading through the documentation, we found that it uses serial communication and a 24-bit data protocol (+gain bits) to send data over the wire.

The following protocol is implemented like the following image. In short, we ensure we can read data from the ADC and dump each bit into a temporary buffer, which finally translates to an actual value in grams.
// ~/rpi/elva-byra-scale/src/hx711.rs#L107
fn read(&mut self) -> Result<f32, HX711Error> {
        if !self.dout.is_low() {
            return Err(HX711Error::new(HX711ErrorType::DoutNotReady));
        }

        let mut buff = 0;

        for _ in 0..24 {
            self.send_pulse()?;
            thread::sleep(Duration::from_nanos(100));
            buff <<= 1;
            buff |= match self.dout.read() {
                Level::Low => 0b0,
                Level::High => 0b1,
            };
        }

        // Sets gain for following reads...
        for _ in 0..match self.gain {
            Gain::G32 => 3,
            Gain::G64 => 2,
            Gain::G128 => 1,
        } {
            self.send_pulse()?;
        }

        Ok(self.translate(buff))
}
Debugging
We can debug the communication over the wires using a logic analyzer and this helpful program. A typical information exchange looked like this.
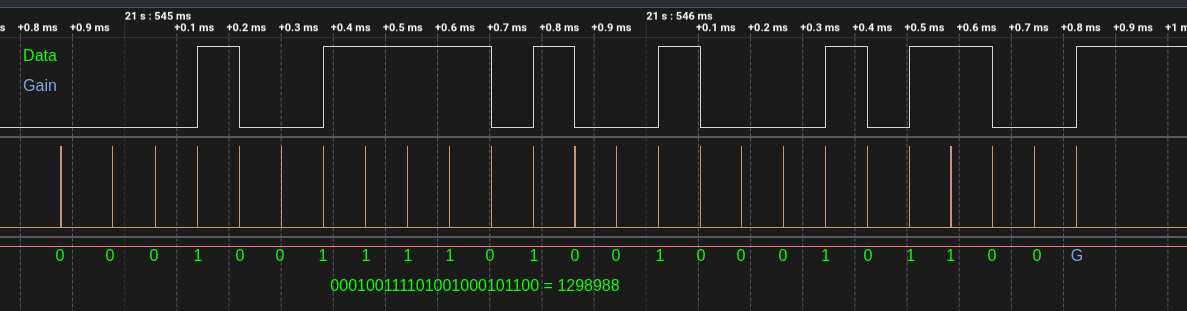
The upper channel is the data channel (sent from the ADC), and the lower is the pulses sent from the Raspberry over the SCK channel (which dictates the read-timings).
We read the expected bytes into our process using the documented timings. Then convert the 24 bits to an integer value (that doesn't mean anything to us for now). After we have ensured that the readings are stable, i.e., not bouncing all over the place and giving us random values, we can move on to translating the actual output to a representation we can understand.
Calibration & Output
Next, we placed the fridge on the scale, ensured all sensors were actively engaged, and noted a few readings. Then, place one kilogram on the scale and do the same thing. We should be able to determine two averages, which will help us translate pressure changes to actual grams.
We now have two reference values, one when the scale is empty and one with one kilogram on the scale.
points_per_gram = (one_kg_reading_avg - empty_scale_reading_avg) / 1000
// ~/elva-byra-scale/src/hx711.rs#L153
fn translate(&self, read: i32) -> f32 {
    (read as f32 - self.offset) / self.points_per_gram
}
Great, we now use this function to translate the reading from the scale to something we can understand and reason about in the upstream services.
Using an offset (empty_scale) of 1076761 in our case and 1099180 (one_kg_reading). We get the following output while having a few things in the fridge that would be ~10 kg of weight.
| 0b | 10 | Grams |
| 000101000001101000000001 | 1317377 | 10732.68 |
| 000101000001100110111100 | 1317308 | 10729.60 |
| 000101000001101001000100 | 1317444 | 10735.67 |
The scaling process reads the scale value at a fixed interval and outputs a more readable JSON structure to the /tmp/byra.sock so that other processes may act on the changes.
$ netcat -U /tmp/byra.sock
# {"datetime":"2023-06-18T12:11:48.759024680Z","grams":3660.4785}
The secondary process listens to this socket and pushes each new sample to AWS IoT core using MQTT and the credentials we received after deploying the infrastructure.
The Result
Finally, we can ensure we're always prepared to supply our guests with cold beverages on arrival and our BoA metric remains in the safe zone.
If you enjoyed this post, follow me on GitHub. I dabble with everything related to fully managed serverless solutions on AWS, embedded stuff, and Rust.
Elva is a serverless-first consulting company that can help you transform or begin your AWS journey for the future